Before I start with this tutorial, I will like to point out, that it was originally created on July 02, 2007, 03:09:15 pm. Over at Mugen-Infantry. I figured that it was time to post the tutorial up over here, for the SnagIt users. And as a personal request for aPoC. ~Thanks for pointing out where to post this. Though, if anyone feels this should be moved, do so.
 NOTE:The following that you are about to read in the link in between the lines, is something that is going for those who use certain Gateway & Dell computers, and notebook PC's. And wonder why the Stereo Mixer / Mono Mixer / Wave Out / What You Hear option is not avaliable in your particular computer or notebook. Please read carefully, and Read it only if it applies to you if you DO NOT have any of the just listed options in your comp or notebook. This applies for XP, Vista & Mac users that encounter this problem.
----------------------------------------------------------------------------------------------
Go to the following link, and
READ CAREFULLY as to what it says about this. And brace yourself for what you will see.
http://support.spacialaudio.com/forums/viewtopic.php?p=83352READ THE WHOLE THING! NOT JUST THE FIRST FEW POSTS IN THAT LINK.End of following Disclaimer/warning message, as stated above.
----------------------------------------------------------------------------------------------
if your comp or notebook/laptop does infact have the Stereo Mixer / Mono Mixer / Wave Out / What You Hear option. Please keep reading. Thank you.It has been asked that I was to at least make a brief tutorial on how to record with SnagIt as well. Since hypercam does not suit well with most ppl. Very Well. I will give a brief Tutorial on how to record with SnagIt. What you see, is with Version 7 of SnagIt. but the same thing can be applied for SnagIt Version 8 as well.
Do the following below.
1. Open SnagIt. (For those of you who need it, you can locate it at
http://www.techsmith.com/ . The version that I use is still snagIt version 7. To me, considered better and more stable than version 8. Those who would like to obtain it, Leave me an email address by PM, and I will send it to you.)
The next set of steps will be shown in pictures, so follow the pictures as you see them appear. they will have readable Text. You can set your Global hotkey to whatever you like, but just like the Hypercam tutorial, i recommend F10.
Also, the following below is only needed to be set one time. So you only have to do the setup once. Unless you do any future changing.
2.
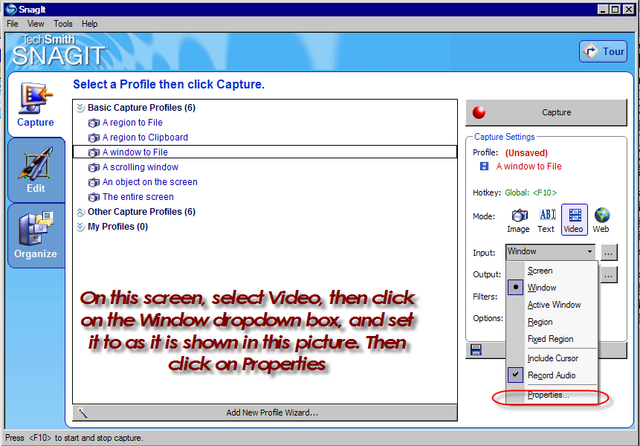
3.
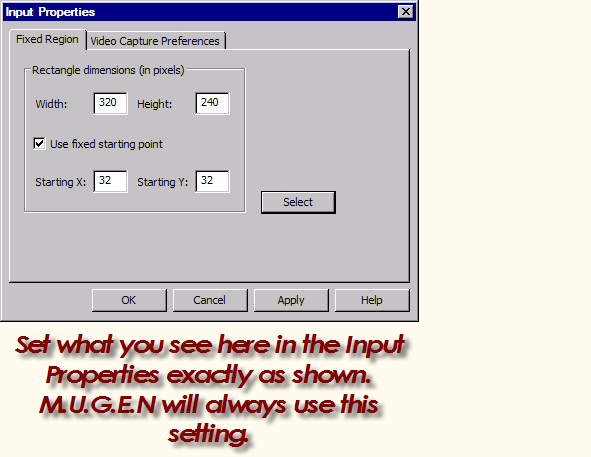
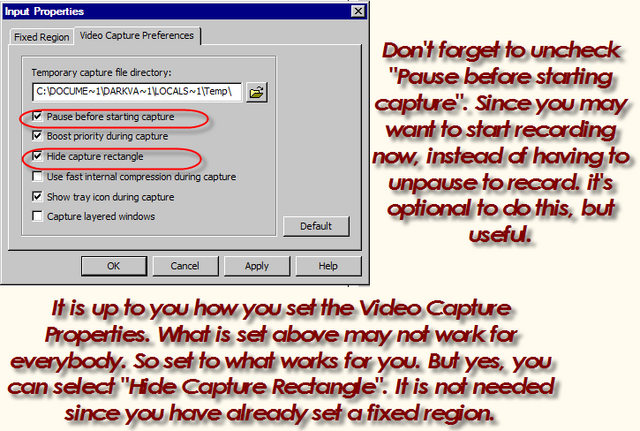
4.
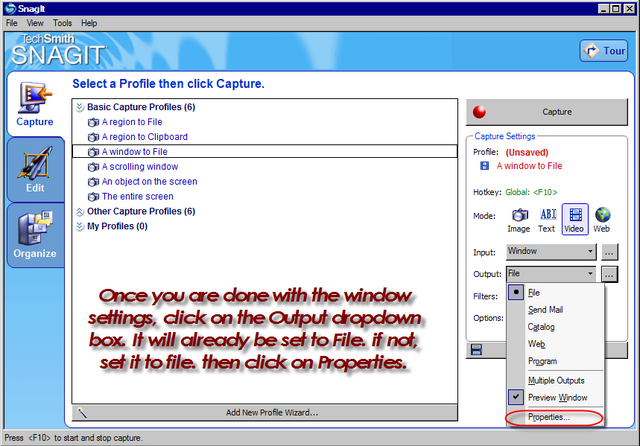
5.
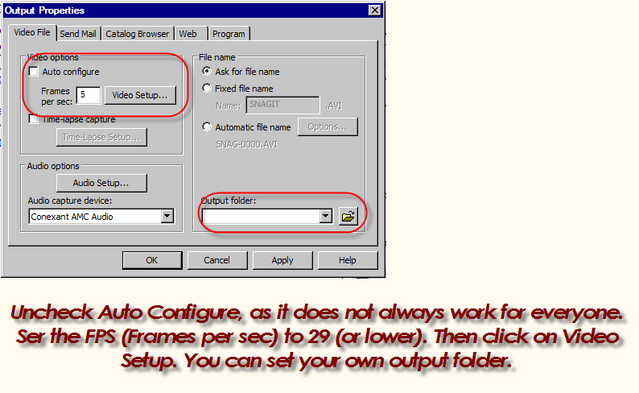
6.
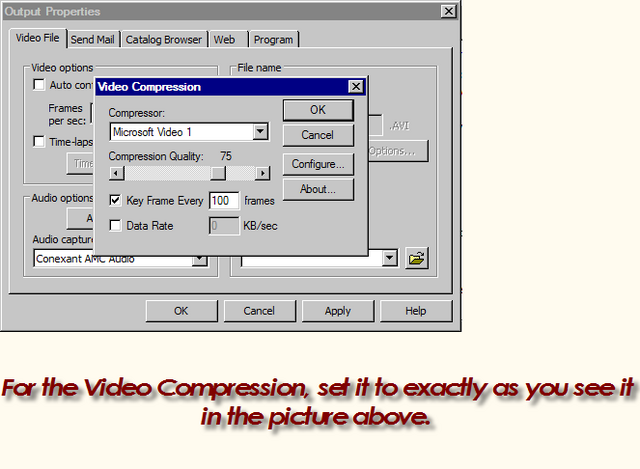
7. Once you have set all what you've seen. Fire up mugen, and start recording.
UPDATE! This update picture below, will apply for those who have SnagIt 8, and want to do what is set in SnagIt 7, regardless of the interface. The Picture will explain itself.Post Update on 7/7/2007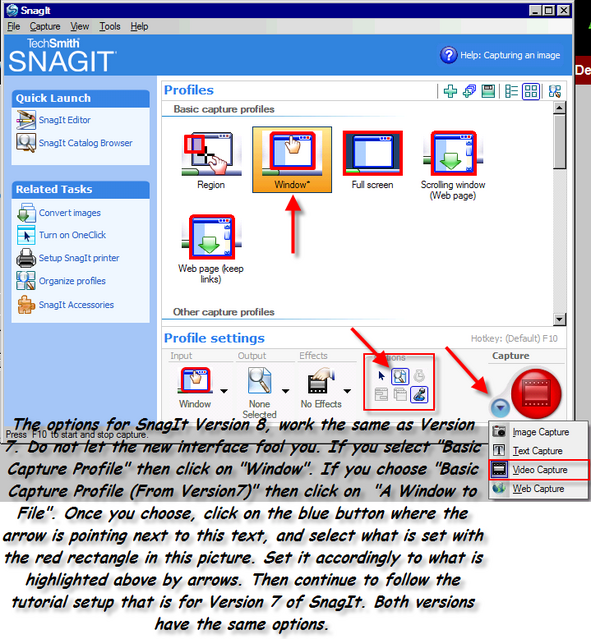
If you need VirtualDub or VirtualDubMod, so you can shrink your videos, or put them in better compression. The active downloads, that come with my custom settings that are open source, and changeable by anyone as they see fit, can be found in the link below, on my site.
http://dv1984.freehoxt.com~Click on the TechStuff Button~
ATTN: Update below is as of 7/9/2007 For those who want to have both versions at the same time, but can't seem to switch. Just read the following.
It is not nessesary to uninstall version 8, to get version 7 going. Techsmith has it set to where any of their programs can install to the same directory, but be in it's own folder. If you're having trouble switching between the two, do the following.
1. Go to the following directory C:\Program Files\TechSmith. It will be shown in th picture below as to what it will look like.

2. Once you are there, do the following in the next set of said pictures. you'll save

of trouble by doing this.
For SnagIt 7 For SnagIt 8
By making shortcuts, you can switch between versions. just as usual, place them on the desktop, or whatever folder you keep shortcuts.
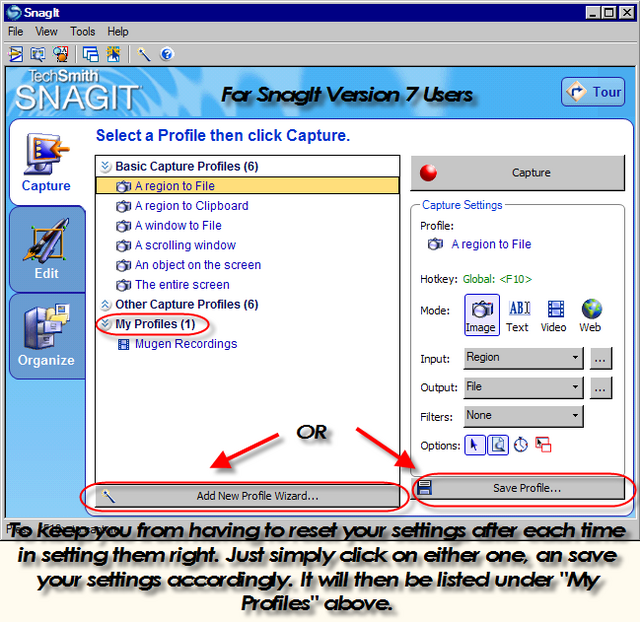
Post Update 7/23/2007This update is for those who want to save their settings, but not go through the trouble of doing them repeatedly, every single time they want to record with SnagIt. Both pictures are for those who have either version. So read carefully
For SnagIt 7
------------------------
For SnagIt 8
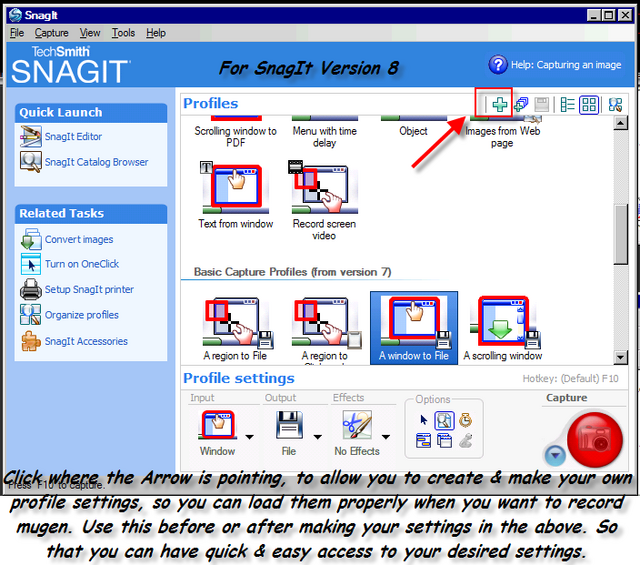
----------------------
Update as of 8/16/2007 ~
This update below, applies for both SnagIt version 7 & SnagIt Version 8~
If you are having a problem with SnagIt dropping too many frames when recording, then do the following below
Once you set & apply from the picture above, go to the output properties, and go to the video configure options for the desired codec (Mostly this works on a few of the codecs. Mainly the one that is shown in the pic below), and set the data rate to 2048 Kb/s. as shown in the picture below.
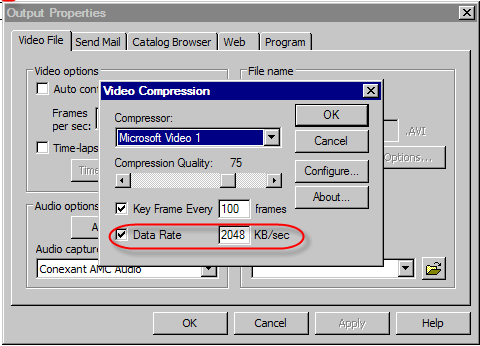
This should at least keep you from losing no more than 1 frame. as 1 frame should most likely be the only thing that drops with SnagIt. If it does lose more than one frame, then experiment with the Data Rate, and see where you can go from there.
Also, if you feel that the window size should be changed, to meet your needs, then adjust it also. 320x240 is normally the optimal setting for recording. But that's just me. It's different for everyone. So self-experimentation is the key here.
Hope the above helps. It may not be like Xiltama's tutorial, but my aim is to assist the beginners & new users.


 Groundhog Day